Monday, February 27, 2017

1/12 Scale Dining Table Set Has Been Completed!

I made a 1/12 scale table yesterday. This table is for the chairs that I have made.
 (See the details of the miniature chairs I have written. "1/12 scale miniature chairs", 
"Making Miniature Furniture")


At the beginning, I had to find off-cuts for making the table but unfortunately there was no right thickness of off-cuts in our workplace. Juno found a little thicker timber and made it the right thickness using the planer for me. I think I was lucky that I could get the same timber of chairs "Util" (another name is Sipo Mahogany).


The next step was the same as I had made chairs, I exported the drawing of the table to DXF format and then imported the data to the other software and made the data for the CNC router.

I'm not used to making the data and setting for the CNC router yet, and realised that there are many points that I have to be careful about. As you know, CNC routers are an automatic cutting machine which are controlled by a computer. I need to set up the coordinates, x, y and z. If I make mistakes for setting these coordinates, the milling bit (a kind of blade shaped like a drill blade) might hit or cut somewhere in the wrong place. Therefore, it's very important setting up the starting point accurately, you must instruct the machine where the x:0, y:0 and z:0 should be.
After the setting of x, y and z or whatever is done, it's finally the time to start. Switch on the motor for the water pump first, then switch on the CNC router. The water has the role to cool down the spindle motor of the CNC router.

As shown in the picture below, Juno attached a dust boot on to the head of the CNC router. On the other side of the head, there is a pipe joint and it can be connected to the hose of the dust collector. Personally, I like watching the machine carving the timber, it's a little disappointing having the dust boot, but when we cut something small, I don't think we need the brush.


Next to the CNC router's work, it's my turn, sanding the table top and legs. Honestly, this job was the most difficult one for me. The thick legs make the table stable but it doesn't look good. This time, I have made ordinary square-like table legs but next time (Yes, I'm going to make more chairs and tables) I would like to make different designed legs. This procedure is not only for sanding, I had to adjust the right size to the grooves under the table top. The puzzle master Juno helped me a lot, he made the curves of the legs nicely.


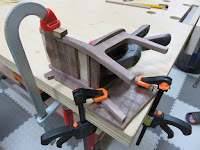
The last step was a bit exciting, adjusting the legs, side aprons and end aprons. I glued all the parts under the table top and made sure that these legs stand 90 degrees.
Until now, there was only flat timber and four short rods, but it became a table!


It's exciting to see it has been completed. Furthermore, I'm so happy to see the table with chairs!


I just remember the animation film "The Secret World of Arrietty." The story is about a girl named Arrietty and her family who live in a house secretly. As far as I could see in the animation film, their height seems to be 1/12 scale. If those tiny people in the film exist, they may love my 1/12 scale dining table set. I'm going to make more Arrietty's size of furniture.

Yukari

Tuesday, February 21, 2017

1/12 scale miniature chairs

If you were a reader who has read my blog before, you may know that I made some miniature chairs.Making Miniature Furniture  Our family business is making wooden puzzles, therefore there are timber off-cuts of puzzles. One day I was looking at those off-cuts and got the idea of making miniature furniture. I like miniatures so I thought this was a good idea.


The first miniature chair was made of plywood. It looked good and I made another chair and a park bench with good timber. Those three miniature chairs are 1/6 scale size.


After making 1/6 scale chairs, I made 1/12 scale miniature chairs as shown in the picture below. The reason I made 1/12 scale chairs is it's easy to get timber off-cuts and also 1/12 scale seems to be the common size of dollhouses.


I made up my mind that I'm going to make miniatures that have the same function and the same method of making as real ones. As you can see in the picture below, there are several holes in the frames. These are tenons. I could glue backrests but I thought a chair that was assembled with tenons is stronger than a glued one.


What made my hope feasible is the CNC router. Yes, I didn't make holes myself, this useful machine made holes. In the beginning, it needed some fine adjustments but once it was set up, it works really well.


After I finish making chairs, I'm going to make miniature tables for these chairs.

Yukari

Saturday, February 18, 2017

Our new puzzle "Aussie Crystal" is available now

We finally released Juno's new puzzle "Aussie Crystal" this morning.


The new puzzle is the same as a traditional 9 piece burr puzzle commonly known as Japanese Crystal or Great Pagoda but Juno designed it to consist of six complex and unusual shapes.


As you can see in the picture below, the pieces are complex shaped. Therefore, Juno glued each part together to make the shape of the pieces, so Juno carefully chose the construction to have at least two unit squares of gluing surface. Some of the end parts are also reinforced by bamboo dowels.


The puzzle is difficult to solve but is not extremely hard, and it could be solved by people who are not used to playing with a puzzle. If you are able to play with it with perseverance and have a little talent for puzzles, you will have no problem..

Aussie Crystal - interlocking burr puzzle

Yukari

Thursday, February 9, 2017

The Table Saw Trouble


One of the most important and frequently used woodworking machines is a table saw. There are three table saws at our workplace and one of them stopped working last week. It was really sudden and we had no idea what happened to it. Juno examined the switch of the table saw carefully but couldn't find the source of the trouble.

That table saw was still new, we bought it last May and it was within the warranty period. Juno asked the shop where he bought it and they agreed to send someone to our workplace to fix it.

This Monday, a man to fix the table saw came. Just in case, he brought a motor for replacing. He seemed to be used to fixing table saws, and he discovered the cause easily.

As shown in the picture below, one of the parts has a black mark on it, it's a corrosion. This is the part where electric sparks fly, and the corrosion gets severe little by little every time the motor starts.


The man taught Juno how to fix it. It was easy, you just have to clean the corroded terminal of the internal switch using sandpaper and it's all done.
After two days passed since the man came, another table saw that is identical to the previously fixed one stopped. Juno opened the cover of the table saw motor and made sure if that part was corroded or not and it was! He cleaned the corroded terminal as he was told and the motor started working.


I don't know if it happens often or happens on specific brand of table saw but it was good to know. Some small tips make work comfortable.

Yukari

Thursday, February 2, 2017

Launching Juno's New Puzzle

(We have started selling Juno's new puzzle "Windmill Burr #2" on our website.)

Hi! I would like to ask you a question first.
Can you guess what these cubes are for?


These cubes are not puzzles, these are a part of Juno's new puzzle.

His new puzzle is "Windmill Burr #2." The reason that there is "#2" at the end is because he designed "Windmill Burr" which was released by Mr Puzzle as a Limited Edition in 2010 (It's out of stock now). Well, I think that there may have been some room for better consideration naming puzzles, anyway he decided to call it Windmill Burr #2.


The method of deciding this name was very simple but it's not so simple to solve. Windmill Burr #2 is composed of 12 pieces and a cube. It may be complicated to solve therefore we will supply the solution by Burr Tools (computer program for interlocking burr puzzle) file format.

The puzzle size is just a good size to hold with the hands and I think you can enjoy playing it comfortably.

Windmill Burr #2 is made from four kinds of timber. The part which stands out the most is the windmill part, and two timbers are used here; Zebrano and Bubinga (See the picture below).
 The inside structure is made from Queensland Maple, and the cube is made from Victorian Ash.


Juno used Silver Ash for Reza 6-8. Silver Ash and Victorian Ash sound like the same kind of timber, don't you think? Actually, these two are not from the same family. Silver Ash and Victorian Ash both have the word "Ash" in the names but they are different species of European Ash as well. It's complicated, isn't it?

There's one more complicated thing. Queensland Maple is used for the burr pieces. Well, I think you have already noticed, yes Queensland Maple is not Maple, it's from the family of Rutaceae. I don't know why some Australian timber names have similar names to foreign timber.
Oops, this blog is not for plant lovers, let's finish talking botany here.

Juno and I hope that puzzle lovers will enjoy Windmill Burr #2.

Yukari